Showing posts with label Sugar and Spice. Show all posts

Friday, October 7, 2011

Laminated Cotton

Remember when the first fabric company took the plunge and put some of their quilting cottons into a laminate?   And the masses went wild?   Now you are hard pressed to find a company that doesn't put a few fabrics from each line into laminated cotton.

Compared to the laminates a few decades ago, these ones are a dream.  Soft, supple, easy to work with, can iron one side, pliable and oh so comfy.

The downside being you can't really pin as it leaves a hole, patching is tricky as it is thicker than cotton and without a teflon foot for your machine, you will be ready to pitch it into a corner.

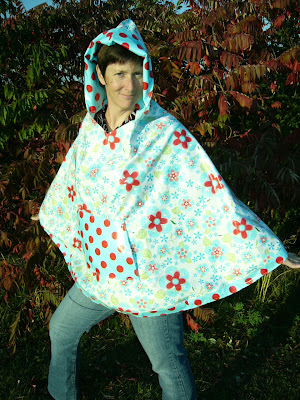
Having said all of that, I had some gorgeous laminate from Amanda's second line of fabric 'Sugar and Spice'.   I finally got to work and made a rain poncho, complete with lined hood and trim around the bottom and a front pocket.


And  please don't comment that I am not 'model material', I already know that=)

On the quilting front, I have two on the go.   Next week, we better have a giveaway to celebrate 500 posts.   Two more to go till the big 500th one!

To all my fellow Canadians, Happy Thanksgiving!   Hope you put on your fat pants for all that turkey to be consumed.

Wednesday, June 22, 2011

Cross Quilt

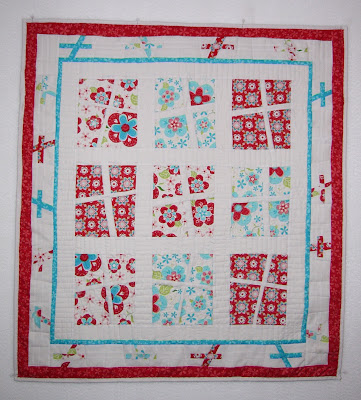
It's done!   And might I say, it was fun.   Another original design by moi.   I used Amanda's funky fabric Sugar and Spice for this little quilt.

The border took the longest, 40 minutes for each side.   Yep, that is over 2 1/2 hours just on that little cross border.   But I really think it adds to the quilt, don't you?


I stippled in the large cross blocks, leaving the white cross free of quilting so it kind of pops out.  It is so hard to see white thread on white fabric.   The sashing is done in lines and where they intersect, it looks a bit like a checkerboard.

Tuesday, June 14, 2011

Riley Blake Tutorial Done

The tutorial actually doesn't air on the Riley Blake blog till July 19th, but my kids will be off school then.  Summer is in full swing, the pool is wet, the sun is hot and my kids need some summer lovin'.

I got it done early.  And I do love it.  I chose Lola's Posies as my fabric collection to work with.  Click on the link and check out these fabrics!  Are they not just sooo much fun?  

I adore this collection by Lila Tueller.  She named this last line after her daughter Lola, how sweet is that?

I can't show you the finished quilt until it gets posted on the Riley Blake Cutting Corners site.  I think it is okay if I show you a little peak...shhh


I must also tell you that I spent part of the day assembling my design wall and I love it.   I even had blocks up on it.   I have almost got the top done for a newly designed quilt using Amanda's Sugar and Spice line.  This I am allowed to show you pictures of, but I don't have any loaded on my camera.   I thought of taking some while the blocks were on the design wall, but then I just got stitching and the borders went on,the blocks went together,  and before you know it, I was almost done the top.  I will try and show you a  peak tomorrow.  

Friday, June 10, 2011

Cup o' Tea

Hi Everyone!

Today is my day to post my tutorial featuring Amanda's new line of fabric 'Sugar and Spice'.

This fabric is so much fun and the line is so varied and unique.   Please go and check me out on The Quilted Fish.    
This is my original teacup and saucer.  I provide all the instructions and the templates.  Trust me when I tell you the template took a few tries before I got it just right.  

These are awesome little gifts.  And you can make them functional by using the teacup to keep your spare bobbins, or seam ripper in.  

I sent Amanda one for Salt Lake City Quilt Market and she loved it so much she kept it!   ( I did tell her that was okay=)

Okay, go check me out and let me know what you think, either there or here.


Friday, June 3, 2011

Mug Rug Tutorial

It's that time again!  The design team for The Quilted Fish is doing their tutorials every Friday.   We are starting with Brooke... please go and check out the tute and how to make these cute mug rugs.
I am up next Friday and you will love what I am going to show you how to make!

Sunday, May 15, 2011

A Piece of Me Attended Market

This past weekend was Quilt Market in Salt Lake City Utah.  This is where all the fabric companies and designers go and showcase their new products to vendors.   The booths are decorated to the hilt and are so fun to look at.

Reading through blogs that have attended market is my absolute favourite thing to do!  I have never attended a market, but it is definitely on my bucket list, right near the very top!

The darling Amanda, from the Quilted Fish, whom designs fabric and I am part of her Creative team, had a booth set up.  I just have to say it was fantastic!   She did a theme of the Mad Hatter Tea Party.

Candice over at Made With Love  allowed me to post one of her pics here.  She is also part of the Creative team that went to Market with Amanda.  Go and check out her blog for some more great pics of the booth.  While you are there, you really must check out her Coffee Tote Bags from real coffee sacks!  Seriously these are  awesome.

So, the super exciting part for me, was that Amanda asked her team to make something for market.  She is such a doll and loves showcasing us whenever she can!

I made a cute teacup and saucer out of her new line Sugar and Spice.

And ....(drumroll please)  here it is at a real market!  Something of mine at an actual quilt market. (insert me jumping up and down!)


Here is a close up of it, before I sent it to Amanda.

That is my excitement for the weekend.   

Tuesday, April 5, 2011

Crayon Tutorial and Sugar and Spice Fabric

First up is the latest fabric from fabulous designer Amanda Herring.   This lovely bundle is called Sugar and Spice and it is just gorgeous.   I don't know how I am going to make  a quilt from it when I refuse to remove the ties.  


Now try not to faint, but here are her laminates!  Aren't they to die for?   You are just going to have to take my word for it that they are soft, smooth as butter and oh so very pliable.   I have a super secret, super sensational tutorial planned for them.


Crayon on Fabric Tutorial

Second to beading, crayon on fabric was the most sought after tutorial being requested.  So I finally found a spare moment to demo it for you.

Supplies:
Piece of light coloured fabric
crayons
several sheets of blank paper


Either trace or draw out a picture or design on your light fabric.  A light pencil is great if you don't want your lines to be visible.   I used a marker so you could see my work better.  Your pencil line will be covered up when you quilt it anyway.

Tape down onto a hard surface.

Start colouring.   I pressed fairly hard as I wanted it to be quite dark due to the fact when you iron it, that will lighten it up.   But you could do light and dark areas with one colour to give nice balance and contrast.   I ususally outline the shape first and then colour it in, trying to keep the strokes going in one direction.


You will find you have to sharpen your crayon frequently so it is easy to get into corners and near borders.

I used Crayola Crayons as I know they work.  Other brands may work too, but keep in mind, sometimes the cheaper ones have a higher content of wax and less colour, so your picture may not be as vibrant.

When you are done colouring, gently blow off any loose flakes, don't rub them off as they may leave a mark.  Remove the tape and head to the ironing board.


Set your iron on the highest Cotton setting, but no steam.  Place a piece of blank paper under it and one covering it.   Press the iron on the paper, moving slowly around.   I held corners of the paper, so it didn't slide around, smearing the crayon.

Once you have  a good amount of crayon residue on the paper, remove it and put a clean piece of paper on top.  I continued to do this until there was no colour on the paper.   It only took a minute.


Remove and voila, you have mastered colouring on fabric with crayon.   Turn it into a pillow or cute wallhanging by quilting it with fun colours to match!